Thursday, May 31, 2018
4 Step Card by Request
YouTube Tutorial: https://youtu.be/vOJpQSB-uvk
Monday, May 28, 2018
MORE GREAT MEMORIAL DAY DEALS! FROM OUT AFFILIATES
MEMORIAL DAY SALE! 30% OFF ENTIRE STORE
We have also added a new collection just in time for the sale! Check this new collection out by Bobunny Early Bird!
Shop here: www.scrapbookingwithme.com
Saturday, May 26, 2018
Just 24 Hours Away!
It is just 24 hours until our Memorial Day Sale begins! We have a ton of items that will be on sale at 30% off! Just use coupon code MEMORIAL at checkout and stock up!! We will be uploading a brand new collection right before the sale so make sure to check that out.
Store: www.scrapbookingwithme.com
Friday, May 25, 2018
Open Front Panel Card
SBWM Group: http://bit.ly/2KUFRaF
YouTube tutorial:
Supplies used:
Card base should be 5 1/2x 4 1/4 to use the same measurements I did.
Measure down from the top of the folded card base 1 3/4" and mark, measure up from bottom 2" and mark. Cut this portion out.
Mats are cut at 2 1/2x4, 1 3/4x4 for top, 1 3/4x4 for bottom.
I double matted mine but you can if you want or just do the one mat.
Stamp your sentiments, put the cards together and you are finished.
I told you quick and easy.
Thursday, May 24, 2018
Sale of the Century!
Cricut Paper Half Price: http://shrsl.com/yxgp
Use our code maymaymadeit and get an additional 10% off and FREE shipping. If you have access get an additional 10% off, Circle another 10% off! Wow you could almost get this free!
Cricut Mats 30% off: http://shrsl.com/yxha
or buy in bulk and get an additional 10% off. And don't forget the access and circle discounts. Use coupon code maymaymadeit at check out to get an additional 10% off and FREE SHIPPING!
Lots of cutting materials 40% off, including vinyl, kraft board, felt and more: http://shrsl.com/yxhf
Don't forget to use the code maymaymadeit for an additional 10% off and FREE SHIPPING! And your access and circle discounts apply.
Give-a-Way!
We are also giving away two sets of these to two lucky winners. All you need to do is watch the video and then leave a comment under the video on how you would use these to have some fun. We will have the drawing on a video on Memorial day at 6pm CST.
Check the company out here is the link: https://amzn.to/2IKRkZE
YouTube review: https://youtu.be/rfZb9EnHoaU
Monday, May 21, 2018
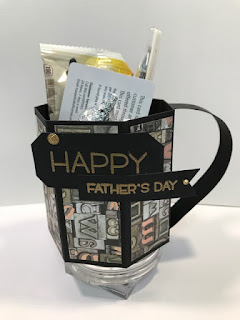
Cup For Dad
Video Tutorial: https://youtu.be/QJmvRG4In4c
Cardstock 7 1/2"x11 1/2"
On long side score every 1 1/2" to the end. You will be left with a 1" piece at the end.
Turn one turn and score at 2" and 5 1/2"
Fold and bunish your score lines. Cut up on all the score marks on each side just to the vertical score lines. One side of these flaps that you just cut apart will fold into the cup to make the top edge finished, the other flaps will create the bottom closure.
Fold over the flaps for the top leaving the one at the end closest to the 1" score line, do not glue this one yet.
On the 1" panel you have you will need to cut off the two end pieces just leaving the center piece to glue the cup together.
Mats are cut at 3 1/4"x 1 1/4", glue these on before you put the cut together this is easier to do now.
Now put adhesive on the 1" flap and glue the cup together. Glue the bottom flaps together making sure to check the shape of the cut as you glue. Glue flaps from opposite sides together, wet glue is easier here, so you can move around to keep the shape.
Handle is cut at 1 1/2x6 invhrd. score on the short side down the middle at 3/4" glue together and shape for the handle. Fold back 1/2" on each end to glue to the cup side. Glue the handle on the side with the 1/2" flaps.
Decorate and fill and the cup is finished.
Friday, May 18, 2018
Teacher Appreciation Gift
YouTube Tutorial: https://youtu.be/-0YfD-TKFQg
Cardstock 12"x9 1/2" inches, score on long side at 3", 3 1/2", 7 1/2", 8"
Fold and burnish score lines, then round the corners of the side nearest the 3" score line, this will be the outside flap.
If you are using magnets or elastic band then put these on now before you put the mats down.
Mats for front cover and inside of front cover are 9 1/4" x 2 3/4" round corners to match the cover base.
You will need 3 mats cut at 3 3/4"x9 1/4" these will be the other outside cover and the two inside middle and left side.
The middle pocket is cut at 5 1/2" x 3", score at 1/2", 3/4" on two short sides and one long side.
Mat for this is 2"x3 3/4"
Cut out the corner blocks and use score tape or a good adhesive to put these together to form your pocket as shown in the video.
The pockets on the left flap are cut at 5"x5" you will need (1), and Cut (2) at 4"x5" you will score at 1/2" on three sides. On the 4"x5" inch ones score on two short and one long side.
Mats for these are cut at 3 3/4" x 4 1/4" for the 5"x5" pocket and 3 3/4" x3 1/4" for the 4" x 5" pockets.
Mark down 1 1/2" from top and make a mark to place the top of your first pocket. Mat this one before putting the second pocket on. You will need to mat each pocket before placing the next pocket on.
For the second pocket measure down 3 3/4" and make a mark to start the top of the second pocket. Attach the third pocket to even with the bottom.
Let me know if you have any questions. If you watch the video and look at these measurements this will make more sense.
Let me know if you make these. We hope you will share on our Facebook group, click HERE to join,
Thursday, May 17, 2018
Teacher Appreciation Gift
Tomorrow we will have the full tutorial up on how this beautiful teacher appreciation project is made. We will also have a blog post showing all the measurements and specific photos of inside and out. Don’t forget to join us on our YouTube channel, become a subscriber and click the notification bell so you will be notified when we put up a new video.
YouTube: https://www.youtube.com/user/SCRAPBOOKINGWITHME
Website: mWww.scrapbookingwithme.com
Wednesday, May 16, 2018
Made It Con Class #4 details!
All supplies will be furnighed for this class as well as a reusable template and SVG file. We will also have lots of great giveaways and doorprizes.
To sign up for this class just click HERE, remember space is limited so make sure to grab your ticket soon.
Graduation Card and Gift Box in One
Video Tutorial: https://youtu.be/eSWrfeCdIxk
Inside box, cardstock 7x9 inches. Score on all four sides at 1/2" and 1 1/2". Cut away the 3 outside tabs leaving only the large square to attach. Attach together as shown on the video.
Ourside cover cardstock 9 1/2x6 1/2 inches, on the 9 1/2" side start scoring at 4 1/8" and score every 1/8" all the way to 5 3/8". This creates your spine. Fold around something round to make it bend.
Place the box on the cover back glugin down, then close with magnets, velcro or ribbon. decorate front cover and you are finished.
Tuesday, May 15, 2018
Window Pop-Out Card
Saturday, May 12, 2018
Made It Con Box Card Class
Friday 14th, 1:00 pm
All supplies to create these cards will be furnished. You will just need to bring your make it kit and your score board.
Click here to purchase your tickets and remember space is limited. http://bit.ly/2KgdDqi
We will play a few games for prizes, give away a large door prize and some other items.
Hope to see you there, E
Thursday, May 10, 2018
One Sheet Mini For Mom
Below you will find the link to the full video tutorial and all the measurements.
Enjoy, E
Tuesday, May 8, 2018
Fancy Fold Box Stepper Card
YouTube Tutorial:
10x7 inch card stock, score on the 10" side at 3, 4 1/2, 6, 7 1/2
Fold on the 6" score mark and place back on your score board. Mark on the fold at 3/4", 2 1/4",
2 3/4", 4 1/4", 4 3/4" and 6 1/4". Connect these marks to the 7 1/2" score line vertically. This will be your cut lines. Cut each one of these lines with the card still folded. This will create your boxes.
Now it is just a matter of folding them in the right directions to create the steps.
Mats are cut at 2 7/8 x 6 7/8 & 2 3/4 x 6 3/4"
Mat 1 3/8 x 6 3/8 and 1 1/4 x 6 3/4 inches
Mat 2 3/8 x 6 7/8 and 2 1/4 x 6 3/4 inches
Mats for steps are cut at 1 3/8 x 1 3/8 and 1 1/4 x 1 1/4 inches
Just put the card together and you are finished.
Monday, May 7, 2018
Double Diamond Fold Card
YouTube Tutorial:
Sunday, May 6, 2018
Made It Con Tennessee Class Info #2
Fancy Fold Card Three Ways-Thursday 1:00pm
This class is going to be super fun we are going to learn three different folding techniques to create beautiful cards. Each card will be completely different and will come with a template, written instructions and SVG file just in case you want to create more of these without doing all the measuring lol. Each student will also receive a link to our video tutorial of these three fancy folds.
All supplies for this class will be furnished and will include: card stock, designer paper, magnets, ribbon, die cuts, glitter paper, embellishments, E-bling, and envelopes. You will receive enough product to do 6 cards.
We will have a CRAFT BINGO game for some great prizes.
We will be using a variety of papers for these classes. Make sure to bring a large score board a bone folder and scissors along with you Make It Kit.
Make sure to sign up before it is all sold out. There are only a few seats left.
Click HERE to purchase.
Friday, May 4, 2018
Thursday, May 3, 2018
Made It Con, Tennessee Class Info Waterfall Mini
We are so excited to be an instructor at the Made It Con In Pigeon Forge, TN, Sept 13-15. We will be sharing some info on each of our classes so you will know what to expect in each class.
Thank to all of you who have signed up today and remember the classes fill up fast so make sure to purchase yours early.
The first class we want to introduce is the Waterfall mini Album, (to purchase this class click here). Class date is Thursday at 6:00pm CST.
This class is going to be so exciting and believe it or not it comes together fast. We will use a combination of medium weight chipboard, paper, a special heavy weight craft card stock, magnets, twine, E-bling, charms and ink. We will also be using scor tape and art glitter glue as our adhesives. The paper line we have chosen for this mini is the beautiful Moments In Time from Photoplay. We will also be using the lovely sticker sheet from the same collection. The charms are small metal charms from my hoard fault. The twine, bling and other accessories also come from our store. All these supplies and more will be furnished as well as a FREE reusable template and PDF. Then after the class you will have access to a full video tutorial, in case you want to make more or just have a question on how to do something but just can’t remember.
We will use a variety of different techniques that I know you will enjoy learning.
Here is the beautiful finished project. I love mine and plan on keeping my grands pictures in it and carrying it in my handbag.
Please make sure to bring your scoring board as well as a bone folder. And your Make It Kit.
Can’t wait to see all of you there.
E


