Pages

Thursday, August 29, 2019

Camera Box with Mini Album

Quick and easy gift idea is this camera box with a mini album inside. I have the tutorial up for the box and tomorrow we will make the little mini and put inside.


Box measurements:

Cardstock that is 11 1/8"x8 1/4" score on the long side at 4 3/4", 6 3/8" turn one turn and score at 1" and 7 1/4".

Design paper is cut at 5 7/8"x4 3/8" need 2 front and back
Design paper is cut at 4 3/8"x1 1/4" need 2 sides


Cut in on the center score lines just to the horizontal score line and wedge out, glue the little flap up and the sides together. Creating your box bottom. 

Box Lid:

Cardstock that is 9 3/8"x4 3/4" score on the long side at 1 1/2, 7 7/8" turn and score at 1 1/2"x 3 1/4"
Design paper for mats are cut as follows;
6"x1 3/8" for top
6"x1 1/8" cut 2
1 1/2x1 1/8 cut 2

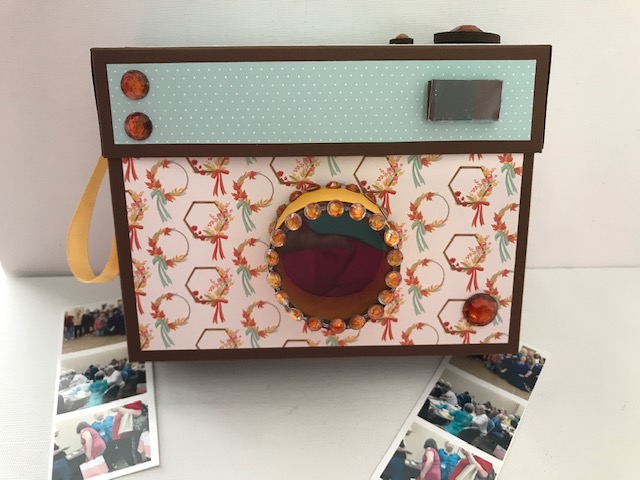
For the little lens I used a paper towel roll and cut a piece that is 1". I then cut a circle that was 2 1/2" and 3 that were 1 3/4". Glue the 3 smaller ones together and place in the center of the large one. 
This piece will go on the bottom of the paper towel circle. You will need to cut slits in the edges so it will fold up and glue to the sides of the paper towel circle. This will create your base.
To create the top or lens part you will need another circle that is 2 1/5" and you need to cut out the center part at the 1 1/5" mark. So if you have another circle punch that is 1 1/5" then just use it and punch out the middle. Take a piece of acetate that is a little larger than the opening and glue on the inside. Cut you slits in this piece as well and glue it on the other end of the paper towel circle creating your lens. If you want to put something inside this little lens you could and it would be beautiful.  

For the circles on the top I used a 1" circle punch and just punched out quite a few and glued them together making a stack. Do the same with the small circles, those are 3/8" circles. This will make your buttons for the top. 

For the little part on the top front I used a piece of paper that was 1/2"x12" and scored every 1" forming an accordion. Cut a piece of acetate and put on the front making it look like the little view finder. Glue the folds together and place on the front. Glue you bling where ever you like. Put your little ribbon handle on the end and it is finished. 


Mini Album

Cardstock cut at 12x4 1/2" score at 5 1/2" turn 180 and score at 5 1/2". 
Page two cardstock 11 3/4"x4 1/2" score at 5 1/2" on each end as above.
Page three cardstock 11 1/2"x4 1/2" score at 5 1/2 on each end as above.
Final page cardstock 11 1/4"x 4 1/2" score at 5 1/2 on each end as above.

Mats for your pages are 4 1/4x5 1/4 you will need 16 of these.

Glue the pages together at the spine in the order shown above and on the video, embellish and you are finished. 


Monday, August 19, 2019

New Style Mini Album With Flips, Flaps and Pockets

A full tutorial is uploading on our YouTube channel now. It is a little long than usual but well worth the watch. This mini is adorable and easy and quick to put together. All product used is listed under the video in the show more section. I love this paper!!


Here are the measurements: 

Chipboard pieces 2 1/2x6
Cover pieces 6x6 inches cut 2

It is best to watch the video after you get your pieces cut or as you are cutting your pieces. This is just easier than me trying to explain how to lay your pieces down. I go into lots of detail on the video. 

Paper for outside cover is:

6x8 cut 1 
5 1/2x8 cut 2

Inside cover pieces:

5 1/2x6 cut 1
4 1/8x5 1/2 inches cut 2

Pages

12x5 3/4 inch score on the long side at 5" and then turn 180 degrees and score at 5"
11 1/2x5 3/4 inch score on long side at 5" and turn 180 score at 5"
11x5 3/4 inch on long side score at 5" turn 180 and score at 5"
10 1/2x5 3/4 on long side score at 5" turn 180 score at 5"

These are your pages and spine. Stack these pages starting with the longest and moving to the smallest and glue together. This is show in detail in the video. 

Mats

Page mats are 4 3/4"x5 1/2" 

Pocket mat is 3 1/4"x4 3/4"

Pockets and Flaps 

Small Pocket is cut at 3 1/2x5 1/2 on long side score at 1/2" on both ends.
Large pocket 5 3/4x6 inches on long side score at 1/2" on both ends
Flaps 5"x6 1/4 score on the 6 1/4" side at 1/2"

Glue these on any page you like. 

You can make pocket inserts or tags like I did to go inside your pockets. 

Cut out the pull tab on the pockets and the flaps, so when flipping through you know where your pockets and tab pages are. 


Thursday, August 15, 2019

Long Card & DIY Matching Envelope

We had lots of messages after we made the templates for the regular size envelopes. Most everyone wanted to know how to make the envelopes for the long cards. So we have done those calculations and here you go. Hope this helps everyone. You know after making this envelope and long card I am loving long cards. I think I may be making more of them soon. 


This card is 4 1/2"x8" when it is finished. 

You will start off with a piece of cardstock that is 8"x8" and I wanted mine off set at the bottom so I scored mine at 3 1/2" this gave me a little big longer back than front. I added a piece of white paper on the inside for the writing that is 3 1/2x7 1/2" and the piece at the top is 3 1/2x8" I used my punch and made a decorative edge on this that I left showing just a little on the outside.  

The flowers on the front are just from some various dies I have that will be linked below the video if I can find them.

Now we are ready for the envelope.

The way you calculate the size of the paper you will need for the envelope is as follows.

Take the length of your card, (8") and add 1 1/2" so your paper would be 9 1/2" wide. Then to get the high of your paper take the finished high of the card times 2 and then add 2" for the flap. 
Example (my card is 4 1/2"x2 = 9" + 2" = 11" so the height of your paper would be 11".

Overall paper size is 9 1/2"x11"

Then on the 9 1/2" side you will need to score at 1/2" on both sides. So whatever size your paper is score at 1/2" turn to the other side and score at 1/2". 

Turn your paper to the 11" side and score the height of your card, in my case mine is 4 1/2", then you will add the height of your card again plus 1/2" to give the back a little extra height than the front. So in my case I then scored at 9 1/2". This leaves me with 1 1/2" flap. If you want your flap to be larger then just add more inches onto the paper size. 

I hope this makes sense if not try to watch the video and read this along with it. I promise it will make more sense then lol. 

Thanks so much. E


Tuesday, August 13, 2019

Pop Up Car Card

The stamp set that came with our August E Club Kit is wonderful. It is right down my alley, travel, that is what I love to do. We did a pop up card using the little car and so other stamps in the set. Hope you enjoy and give it a try. We do still have 4 Aug kits available that include these stamps if you want one just click the link HERE.


The size is 4 1/4x5 1/2
Top mat is 4"x 5 1/4"
Small mats are 2 3/4x3 1/2
2 1/2x3 1/4

Inside pop up: cardstock 2 3/4x6 1/2 score on long side at 1 1/2, 3, 4 1/2, 6 fold over glue flap and create the box to glue on the inside. This will hold your car and the road. 

Banners are cut at 3/4x2 then just cut to side depending on what you want. 

Inside mats are 4x3 3/4


Monday, August 12, 2019

Mini Album and More Storage

We are making a storage for mini albums, journals, notebooks, glasses, pens and more. This is a very functional storage container you can sit beside your bed or on an end table to hold all those items that tend to collect there. The over all size is 6"x9 1/2"x6" so it is perfect for the tables.  Below is the full tutorial as well as the measurements and photos. Hope to see you guys make a few of these they can be used for so many different things. 


Share in our Facebook Group


Measurements

Chipboard sizes
Bottom: 6x9 1/2
Sides 6x9 1/2 cut 2 of these
Back 6x6
Divider 3 1/2x6

Construction strips 1"x12" score in the center at 1/2" and place score tape on both sides of the score line. Use this to attach the chipboard together.
After joining your chipboard pieces together go ahead and cover the outside edges of the chipboard. This will give you a base mat and make the piece more sturdy. 


Inside Mats

Inside mats are cut 1/16 shy of the chipboard. 

Outside Mats

Front mat 5 3/4"x2 3/4"
Side mats cut 9 1/4"x5 3/4" cut 2 and then lay against your chipboard and trim to match the angle. Cut 2 of these.
Back mat is cut at 5 3/4"x5 3/4"
Bottom Mat is cut at 9 1/4"x5 3/4"


Divider

Make sure to put your constructions strips on two short sides and one long side and then turn it over and do the same. This way when you place it in the container it will not slip. I show in the video how to place it in. Mat for the divider 5 3/4"x7 1/8" this piece will fold over the top of the divider and onto the back forming the full mat.You will place it at the 2 1/2" mark from the front. Put a construction strip on the top to cap the top off and cover the chipboard. Glue it down

Products Used

All products used in this project are listed below the video.


Wednesday, August 7, 2019

Tent Box Card, Matching Envelope & Dolly Parton?

Well after reading the title I bet you are curious as to what I am talking about lol. You will have to watch the video to get the full story, but I do tell you how my MS butterfly punch ended up in Dolly's hands. 

The measurements for this card are very easy and it comes together very fast, you could make many of these without any trouble at all. If you do make these cards make sure to share on our FACEBOOK group, we love to see your projects. 

All the measurements are below and you will find links to all the products used under the video. Hope you make a few and share them with us. 


MEASUREMENTS FOR CARD

Cardstock is 6"x12" on the long side score at 1/2", 1 1/4", 2" and 7". 

Mats for the front are cut at 5 7/8"x4 7/8" white sheet
Top mat is 5 3/4"x4 3/4" designer paper

Find the center of the bottom of the design paper and mark it. mark up from the center mark 1 3/4", now cut from the center bottom to the spot up at 1 3/4". Take your ruler and place it from the end of the cut to the side point of the card bottom and fold this back, do this to both flaps. Fold them up and reinforce. 

Scallop punch is 2 1/2" in a matching color
Circle punch is 2" in black or matching color

Butterflies one is about 1 1/2" and the others are 3/4" and 1/2". If I can find any of these punches I will leave the link below the video.

Put your mats on the front of the card and then glue the 1/2" flap to the back side creating your "tent" fold. 

Embellish as you wish and you are finished.


MEASUREMENTS FOR ENVELOPE

Since your card measurements 5"x6" you will need to come up with an envelope. We have took the guess work out of this for you. 

Make a template out of some lightweight chipboard like a cereal box that is 5 1/2"x6 1/2". 

To get the size paper you need for your card you need to take the cards largest size and add 3" since this is an odd side card and not a square. See our video below if you would like to see how to calculate you envelope sizes. Since your largest size of your card is 6" then you add 3" and you come up with a 9"x9" piece of paper. Take your template and place catty cornered to the points of the paper getting it as close the even on all sides as you can. fold the paper around the template, you can shift the chipboard to make the side points come out even across from each other, as I show int he video. Do this on all sides and then take the template our and reinforce your score lines. Cut out the corners as I show in the video and trim or round the points. Glue together and you have your matching envelope. 


Sunday, August 4, 2019

Lots Coming Up! 

We are home, rested, feeling much better, with lots of catching up to do. We just wanted to give you a quick update on some things to expect in the next few weeks. 

First off we have our August "E" Club Kits going out tomorrow 8/4/19. For those of you who purchased the Aug add on Kit it will be included in your kit box. For anyone who hasn’t purchased the Aug add on and you are a kit member, keep in mind you get FREE shipping. It will charge you but we will reimburse the shipping amount. If you would like to purchase the add on kit click this link. We only have a few more available. You will get not only the items in the kit to make the Photo Rolodex, but you will also get a link that will have full step by step instructions, photos, templates, PDF’s and an exclusive video tutorial. We will have our tutorial finished this week, sorry it is running a little late, I just did not feel like working on it. 

If you would like to join our "E" Club Kit, just click this link. And remember you can cancel, skip a month, and renew anytime you like. More exciting news for members is starting August 4th you got 20% off all regular priced items from our store instead of 15%. Your code will be the same and will be effective starting tomorrow 8/4. And for all the details, PDF’s, templates, video links and more join the Club Kit members room. We have some exciting projects coming with this kit. Can’t wait to share them with you. 

We also have two giveaways to get posted this week. The winner for our Marine Life stamp set and for our YT end of the month giveaway. So make sure you are a subscriber to our YouTube so you don’t miss out. 

Online classes will be delayed one month. They will be available to purchase on Sept 1st. We were just not able to get everything ready for Aug 1st start up. We are keeping the cost very inexpensive so more will be able to take the classes. We want everyone who wants to, to be able to take part, therefore classes will only be $12.99 for the class link which will include, Video tutorials, PDF’s, templates, written instructions and photos.  If you want the full CLASS BUNDLE, which will include, Video tutorials, PDF’s, templates, written instructions, photos and all the paper, embellishments, metals, bling, die cuts, etc, that I use for the project, those will also be available for purchase at this time as well. Prices on the Bundles may vary from month to month based on the projects we create. More on this with links will be coming later in the month. 

Stay tuned to our YouTube channel we have lots more coming up this month. 


Thanks everyone for your support, E


Thursday, August 1, 2019

Why I Am MIA Lately

Hey guys, it is E, I know long time no see right? Well I thought I would drop in and give you a quick update on what has been going on and why I have been MIA lately and hopefully when I will return.

I have been fighting a really bad infection that has caused severe migraines and lots of pain. Doctors have me on some strong antibiotics and pain meds that just make me feel even rougher. I have struggled with keeping up with orders, affiliate posts and kits, but I have just not felt like doing videos. Since the infection is in my jaw, it hurts really bad when I eat, talk, smile or just to open my mouth. Thus the reason no videos have been up lately. I will get them caught back up just as soon as I can.

We decided to take a few days off and take the grands to the beach and maybe during this time I could just rest and feel better. And so far so good. I am feeling better, not there yet but I am a lot better than last week. My "right hand man" Whitt, has been having some health issues as well so we are just staying in the condo, resting and relaxing while the kids and grands do their thing. We do get up and moving in time to go eat lol. Soft foods have become my friend lol.

I just wanted to fill you in on why you haven't seen me lately and to let you know that I will be back to full schedule soon I hope. And to also thank you for all your prayers, messages, well wishes and sweet comments. You guys are awesome and I know the prayers are why I am getting better so keep them coming please.

Until next week, (I hope), we will continue to rest and relax.

Love all of you and thank you all for your support. I could not do this without you.

With Love, E