Pages

Tuesday, July 31, 2018

Flying Butterfly Card

We tried a new style card today it is easy but looks complicated. Join us on our YouTube for the full tutorial. This we made up as we went along lol. Hope you enjoy. All the links to products we used as well as the link to the full tutorial are below.

YouTube tutorial: https://youtu.be/sns3ekce7ls 

Products used:

Bejewelled Stamp & Die Set: http://shrsl.com/1342f
Score Board: http://bit.ly/2NTdtXI
We R Ruler: http://bit.ly/2AIDEKR
Mono Sand Eraser: http://bit.ly/2IrGTNu
Tim Holtz Scissors: http://bit.ly/2xbTxaB
Diamond Stickles: http://bit.ly/2LFz7SI
Pick Up Tool: http://bit.ly/2zMUWKx
Art Glitter Glue: http://bit.ly/2FGCXmz
Wink of stella: http://bit.ly/2MbV9sW
Nuvo Glitter Pens: http://bit.ly/2IjhBkK
 Scor Tape: http://bit.ly/2H0Q5Yo
TH Stamping platform: http://bit.ly/2xbTxaB
Neenah Cardstock: http://bit.ly/2Icxdqc
T-square Ruler: http://bit.ly/2I5AJPK
Basic Grey Magnets: http://bit.ly/2K3Hr9M

Made It Con Tennessee Classes: http://bit.ly/2Etx53T
Join Our Chalk Couture Team Or Make a Purchase:
For info on the Maymay cruise: gina@cruisebrothers.com
https://edithwray.chalkcouture.com/store

Measurements

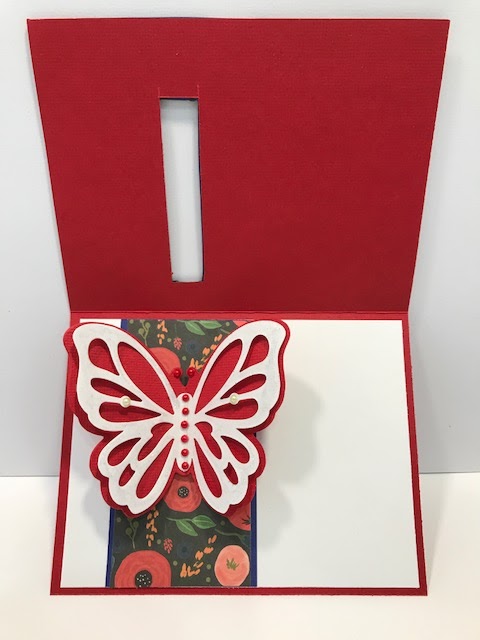
Card base is 8x6 score on all 4 sides at 1/2", cut corners slightly and fold in and glue together as if you were creating a pocket. 

Cut a piece of card stock at 5x7 and then a mat for this at 4 3/4"x6 3/4" glue these together. Measure in from each side (on short sides) 2" and make a mark with pencil. Come in from the end 1/2" make a mark. Do this on both the short ends. Connect the lines and this is the part that you will cut out to make the opening.  

Your pull tabs are cut at 1 1/4"x8" (2) and 1"x4 7/8" (2) glue the same sizes together to make stronger. Glue the short one to the end of the long one forming a T

Stamp on your pull tab now before you go any further. Put a light pencil line on the base beside the pull tab and this is the place you will stamp for the under neath stamp. 

Cut out your pieces for the top, butterfly, car, boat, airplane etc. Glue the top on the card using a non wet glue and then place your object on the pull tab at the end. Decorate as desired and you are finished. 

Hope you enjoy, E


Monday, July 30, 2018

Christmas "Box" Card

Christmas Box Card

This is a quick and easy design but oh so beautiful. This could be mass produced for all those loved ones. Below you will find a link to the full tutorial and the links to the products I used with the exception of the stamp and I couldn't find it in stock anywhere, sorry.

Video Tutorial:

Products Used: https://youtu.be/PA8pSTT3dho


Score Board: http://bit.ly/2NTdtXI
 Embossing folder: https://amzn.to/2M45MgZ
Pick Up Tool: http://bit.ly/2zMUWKx
Art Glitter Glue: http://bit.ly/2FGCXmz
Wink of stella: http://bit.ly/2MbV9sW


By using our links you help support our group and our channel. We really appreciate it so much. This does not cost you anymore either. 

This is an A6 card, the card stock is cut at 9x6 1/4 score on the long side at 4 1/2"

Front mat is 4 1/2"x6 1/4" and the top mat is 4 1/4"x6"

Middle strip is 1 1/2"x6 and the top is 1"x6"

Small boxes are cut at 1 1/4"x1 1/4" and the mat is cut at 1"x1"

use button or brad for center and a stamp and you are finished.

Thanks E


Tuesday, July 24, 2018

20,000 Subscriber Giveaway!!

We have reached 20,000 subscribers on YouTube and we want to thank all of you for your comments, likes, shares and views. We are having a giveaway! Below is what we are giving away and how you can enter. Good luck to everyone!

Rules: 

You must be a subscriber
Must be over 18
Open internationally
Winner has 48 hours from the time they are announced to contact me by email, giving me their information. If not contacted in 48 hours another winner will be chosen.  ediwray@hotmail.com
Only positive comments will be added to the entries.
Don't subscribe just to try to win, this is for our faithful subscribers.

How to enter:

1 entry = leave a comment under the video about the giveaway on YouTube, and share the video.
2 entry = Leave a comment under this post
3 entry = Follow this blog
4 entry = Follow us on Instagram 
5 entry = Like our Facebook Page

What you could win! 

1st prize is $100 gift card to the store - www.scrapbookingwithme.com 
2nd prize is $50 gift card to the store

When does it end:

August 31st, 2018

When will the winners be announces:

September 1st, 2018, on our YouTube channel

Thanks again, E


Thursday, July 19, 2018

Z Fold Box Card

This is an all in one card that I hoped would come to life like I had it in my mind. I think it did. You may say way to busy but sometimes I like busy, and sometimes I like plain. Just all depends on the mood I am in and who I am sending it to. Hope you enjoy. All measurements as well as the links to products used are below.

YouTube: https://youtu.be/4c_r7amOGDI 

Products Used: 

Butterfly die: https://amzn.to/2LawiZB  
July Kit: http://bit.ly/2G6HJyd 

Score Board: http://bit.ly/2GRRf9u
Tim Holtz Glass Mat: http://bit.ly/2LqqZBh
Clearance album: http://bit.ly/2L31WYY
Pick Up Tool: http://bit.ly/2zMUWKx 
Art Glitter Glue: http://bit.ly/2FGCXmz
Basic Grey Magnets: http://bit.ly/2K3Hr9M

You will need a card base or cardstock cut at 7x10 inches, this will be a A7 size card 5x7"

On the long side score at 2 1/2 inches and 5 inches.

Cardstock for the Z part base cut at 2 1/2"x9 1/2" the mat for this is cut at 2"x9 1/2", on the long side score at 5 and 7 1/4 inches. 

Mats for the front and middles panel, base mat is 2x 6 1/2 inches you will need two and the top mat is 1 3/4x6 1/4 inches.  The back panel mats are 4 3/4x6 1/2 inches and 4 1/2x6 1/4 inches.

Strips for the box part are cut at 1/2"x3 1/2" and scored at 1/2" on each end.  

Embellish and that is your card. 

Hope you enjoy and please don't forget to share with use over on our Facebook Group

E


Wednesday, July 18, 2018

Origami Box/Card

A quick tutorial on this origami box card is up on our YouTube, hope you will go check it out. Below you will find links to the products we used as well as the link to the full tutorial.  And since the fold is a little different we have step by step photos of the big box.

YouTube Video: https://youtu.be/Vw7CBidnlDo 

Products Used:


Score Board: http://bit.ly/2GRRf9u
Tim Holtz Glass Mat: http://bit.ly/2LqqZBh
Clearance album: http://bit.ly/2L31WYY
Pick Up Tool: http://bit.ly/2zMUWKx
Art Glitter Glue: http://bit.ly/2FGCXmz
Basic Grey Magnets: http://bit.ly/2K3Hr9M


Cardstock for base is 6x5 1/2" on the 6" side score at 2 7/8 and 3 1/8.

Pockets using a light weight cardstock are cut at 7 1/2x7 1/2 inches cut (2)
Pockets using a light weight cardstock are cut at 8x8 inches cut (1)

Mats for inside pockets 2 1/5x5 1/8 cut (2) one for inside and one for top.
Mat for inside small pockets 2 1/5x2 1/5 inches cut (2)
Front mat is cut at 2 1/5x5 inches

Top mat for small pockets is cut at 1 3/4x1 3/4 inches cut (2)

Ribbon cut 2 pieces about 6 inches
Then just embellish

Hope you enjoy,

E


Tuesday, July 17, 2018

Interlocking Butterfly Card

This card is a sweet card that looks like it would take a long time but really it doesn't. You can use any die for the interlocking portion you don't have to use the butterfly. Just make the opening accordingly. Below is the link to the full tutorial as well as the product links I used. Thanks so much for using my product links this helps support out channel.

YouTube tutorial: https://youtu.be/HowvOK3SPuA

Products Used:

Score Board: http://bit.ly/2GRRf9u
Paper collection: http://bit.ly/2L31WYY
Birthday Stamp: http://bit.ly/2zJC27a
Pick Up Tool: http://bit.ly/2zMUWKx
TH Stamping platform: http://bit.ly/2xbTxaB
Butterfly Die: https://amzn.to/2JvxO2T
Neenah Cardstock: http://bit.ly/2Icxdqc
T-square Ruler: http://bit.ly/2I5AJPK
Art Glitter Glue: http://bit.ly/2FGCXmz
1x1” clear block: http://bit.ly/2EPwgi2
Basic Grey Magnets: http://bit.ly/2K3Hr9M
Wink of stella: http://bit.ly/2MbV9sW
Purple tape: http://bit.ly/2pTQjqM

This is an A2 size card that is 4 1/4x5 1/2 inches. Using the 5 1/2 inch across the card.

Mats are cut at 2 1/4x4 1/4 inches, these go on the top
2x4 1/4inches

Inside mats are 2 1/4x4 and 2x4 inches.

To cut your opening for the top of the card just measure your die depending on what size the die is will determine what size your opening needs to be. Mine is 1/4"x3". See the video to see how I determined this.

The mat for my sentiment is 1 1/4x2 3/8" and 1 1/2x2 1/2 but your may be different.

Hopefully this will help.

E


Friday, July 13, 2018

corner fold card & envelope

Corner Fold Card & Envelope

Today we are making a corner fold card with an envelope to match. Using the beautiful 49 & Market stamp set this card comes together really easy and makes a beautiful "different" card. Below is the link to the full tutorial as well as links to all the products used.

We appreciate you using our product links and purchasing from our store, this helps support our channel and keeps videos like these possible.

Video Tutorial: https://youtu.be/zra2dhiiv5s

Products Used:


Score Board: http://bit.ly/2GRRf9u
TH Stamping platform: http://bit.ly/2xbTxaB
Neenah Cardstock: http://bit.ly/2Icxdqc
T-square Ruler: http://bit.ly/2I5AJPK
49 & Market Stamp: https://amzn.to/2NQ0pD9 

Art Glitter Glue: http://bit.ly/2FGCXmz


1x1” clear block: http://bit.ly/2EPwgi2
Envelope Punch Board: https://amzn.to/2NeEZ1s

Bonus Bucks: http://bit.ly/2lC9OSf
Code to get 15% off is: Rewards

You will need cardstock that is cut at 8x8 score at 4" on two sides, then from the center score out to one of the corner points. On the opposite square from where you scored that angle line cut up on the side score line just to center, this piece will then be glued behind the other one to make the corner. 

Mats are cut at 3 3/4x3 3/4 you will need three for inside and you will cut one in a triangle to fit the box you scored in half. And you will need one mat for the front cover. Decorate as desired.

For the envelope use the envelope punch board and cut your paper at 6 7/8x6 7/8 put in the punch board on the 3 1/2" mark and punch and score. Turn placing the point of the punch at the score line you just made punching and scoring again, do this all the way around. You can stamp your envelope or leave as is. Easy and quick. 


Thursday, July 12, 2018

Watercolor Triple Layer Card

This card is super easy but looks very beautiful. Below are the measurements as well as the links to the items we used and the YouTube tutorial.

YouTube tutorial: https://youtu.be/6uk8nEXGRHo

Products Used:


Arteza Acrylic paints: http://shrsl.com/1177n
Watercolor real brush pens: http://shrsl.com/1177r
Fineliner pens: http://shrsl.com/1177v
Detail Brushes: http://shrsl.com/11784
Mono Sand Eraser: http://bit.ly/2IrGTNu
Score Board: http://bit.ly/2GRRf9u
TH Stamping platform: http://bit.ly/2xbTxaB
Neenah Cardstock: http://bit.ly/2Icxdqc
T-square Ruler: http://bit.ly/2I5AJPK

Thank you for helping support Scrapbooking With ME buy using out links. 

Start off with cardstock that is 11.5x5 score on the long side at 1/4", 3 3/4", 7 1/4". Turn where the 1/4" score line is at top and score at 5/8" just down to last score line. This part you will cut away. 
Accordion fold the card. Cut a piece of cardstock that is 2 3/4"x4 1/4" and add to the end at the 1/4" flap. This creates your 3 tier card. 

Cut away the small 1/4" score line that is still showing after you glued the last flap on.

Now your layers. I double matted mine so I will give the measurements for that. 

Back mat is 5 1/4"x4" and the top mat for that is 5"x3 3/4"
Middle mats, 4 3/4"x3 1/4" and the top mat is 4 1/2"x3"
Front mats, 4"x2 1/2" and the top mat for this is 3 3/4"x2 1/4"

Decorate as desired and you are finished, this card will fit in a standard envelope. 


Tuesday, July 10, 2018

New Products & Back To The Doctor

New Products and My Face Dilemma

Well it has been a week tomorrow and I am still very red and itchy. Going back to the Doctor tomorrow to get more test. I will let you know the results, but in the meantime here is a ton of new products for you to view. We did a video on them today and below you will find the direct links. Thanks so much for all your prayers and well wishes. I really appreciate all the kind comments. I do read everyone of them.

Here is the video of the new products: https://youtu.be/z3JQXwu6YWU

Here are the direct links for the products:

Nuvo products: http://bit.ly/2JvaMcK
     confetti         http://bit.ly/2JvaMcK
     pens              http://bit.ly/2ucLQnJ
   accent glaze: http://bit.ly/2KYPGIc
crystal glaze:    http://bit.ly/2NFR01a

Prima Santa Baby: http://bit.ly/2N3L3Kc
Pinkfresh stamps & dies: http://bit.ly/2N6plW6
CB gone camping: http://bit.ly/2zqr0nf

Okay no makeup and looking awful but here goes.


Tuesday, July 3, 2018

Multi Fold Card With Interlocking Panels

Create A Card With ME

Today we are making a card on the fly, no instructions, just have a look I want to try and achieve so we are going for it. Hope you don't mind we are doing this on camera with you. This video is a little longer than most, but I hope you enjoy. Feel free to fast forward through some of the coloring.

I have used my Arteza products to create the beautiful coloring. The more I use these the more I love them. Below you will find links to all the products I have used, that I could find links for that is. And keep in mind that the Arteza is 10% off if you use my code when purchasing.

The video is uploading now. HERE

Products used:

Arteza fine liner pens: : http://shrsl.com/1177v  (use code EdithWray10 for 10% off order)
Gel Pens: http://shrsl.com/1177y  ( use code EdithWray10 for 10% off order)Memento ink:  https://amzn.to/2Iv7KUO
Sizzix doily die: https://amzn.to/2MMznv4 
1x1 clear acrylic block: http://bit.ly/2EPwgi2
KC stamp key to my heart: https://amzn.to/2KHIvAD 


Card base is 5x6 inches
Center mat #1 is 4 3/4x5 3/4 inches
Center mat #2 is 4 1/2x5 1/2 inches

Side pieces

5x3 inches score at 1/2 on long side cut 2
6x3 inches score at 1/2 on long side cut 2

inside mats are 2 1/4x4 3/4 cut 2
                          2 1/4x5 3/4 cut 2

Back piece is cut at 5 3/4x4 3/4 inches

That is all the cutting. Then just decorate as you wish.

Enjoy, E


Monday, July 2, 2018

Made It Con Video Preview #2

Tomorrow we will be doing a video on this lovely waterfall mini album. I can not wait to teach this class! It may look difficult but you will be surprised just how simple it is and how quick it comes together. 

If you want to see this jewel up close and personal then join us tomorrow on our YouTube

This class is almost sold out so don’t miss this preview if you are thinking about taking it. 

Here is the link to the class

Thanks and see you tomorrow. 

E


Made It Con, Fireplace Christmas Decor or Gift Box Preview

Arteza Watercolor Real Brush pens, Gel Pens EdithWray10

Sunday, July 1, 2018

Only 10 Weeks?

Oh my goodness there are only 10 weeks until Made It Con, Tennessee!! Can you believe it?

This year has gone by so fast, it seems only last week we were in Texas with all of you sweet crafters. Now we are nearing time for the second Made It Con! Wow!!

This week on our YouTube channel we will be featuring a project from each of our classes as well as telling you about a few surprises we have in store. Make sure to tune in, you don’t want to miss out. 

If you are not already signed up make sure to go over to the link below and get in on the fun. We promise you will have a great time and come away with a huge bag of goodies. 

Below is our YouTube make sure to subscribe and click the notification bell so you know when the videos go up. We start off tomorrow with our Home decor lighted Fireplace class. This one is very interested. It can be used as a home decor piece or a gift box. 

Class info: https://www.maymaymadeit.com/collections/edith-wray

YouTube: https://www.youtube.com/user/SCRAPBOOKINGWITHME

Thanks so much.  We can’t wait to see all of you! Let us know if you have any questions. 

E