
Friday, May 31, 2019
Thursday, May 30, 2019
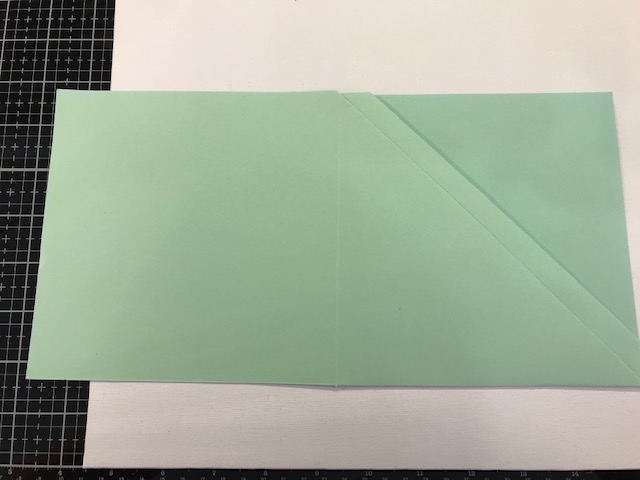
Hidden Pocket Birthday Card
Easy and quick hidden pocket birthday card is our project today. This one is so simple you will want to make one in every size and it is simple to change the sizes to fit your needs.
I started off with a 12x12 piece of cardstock because I wanted a 6x6 card. If you want a 5x5 then start with a 10x10 inch piece of paper and follow the same directions below. If you want a 4x4 inch card start with a piece of paper that is 8x8 and so on. You are just doubling the size of the paper depending on what finished card you want.
Score the cardstock down the center turn and score down the center again. Now cut in on one of your score lines just to the adjoining score line as shown in the photo below.


Mats are cut at 5 3/4x5 3/4 unless you want to double mat and then cut the bottom one at this and the top at 5 1/2x5 1/2 inches. The cross piece that is stamped on is 2 3/8"x5 1/2" for the black and 2 1/2x5 1/2 for the white. Piece for the inside going across the pockets is cut at 3 3/4"x5 3/4" and the top mat is cut at 3 1/2x5 1/2 inches. Decorate and embellish and you are finished.
If you give this project a try please share on our Facebook Page.
Thanks E
Wednesday, May 29, 2019
Stationary Gift Set For 5x7 & 6x6 Cards And Envelopes
Here is a larger purse stationary gift set. This one will hold those large cards and envelopes you make or just use it as a gift set. Lots of possibilities with this one. Below is the link for the full tutorial as well as photos and measurements. If you make one of these don't forget to share on our Facebook Page.
You will need two pieces of 12x12 cardstock to create this beautiful gift set.
On one side of the 12" paper score at 1/2, 2, 10, 11 1/2 inches turn one turn and score at
1/2, 6 1/2 and 8 inches
Bottom joining piece is 3"x8" score at 1 1/2" on 3" side.
Flap is cut at 8"x6 1/2" score on the 6 1/2" side at 1"and 4"
Mats are cut at 2 1/4x7 3/4 inches cut 2
Mats cut at 2 3/4"x 7 3/4" cut 2
Mats cut at 5 3/4"x7 3/4" cut 2
Mats cut at 3 3/4"x 7 3/4" cut 2
Front mat for flap is cut at 1 3/4"x7 3/4" cut 1
Handles are cut at 12x 1 1/4" cut 2
Mat for handle cut at 12x1" cut 1
Chipboard is cut at 5 7/8x 7 7/8" cut 2


Thursday, May 23, 2019
Father's Day Toiletry Gift Box
Drag out those dark papers and lets get to making some Father's Day projects. I have a dark blue cardstock then a pattern paper that is blue and white stripe. I think this will look great for any man. The full tutorial is below as well as the measurements and template photos. Hope you enjoy and don't forget to share with us on our Facebook Page. Just ask to join.
Shave/Toiletry Gift Box For Dad
You will need two pieces of cardstock that is cut to 8 1/4"x11 5/8" on the long side score at 3/4" and 3 3/4", turn to the right with your 3/4" score line at the top and score at 3", 7 1/4" & 7 3/4". Then go back and score at the 5 3/4" mark just down to the second score line. Turn the cardstock back where you first scored with the two double score lines at the top of the score board and at the 2 1/4" mark score just down to the second score line.
Now take your ruler and from the end of this score line that you just made score out to where the other score lines meet on both sides as shown in the photo below. Creating a triangle.


Then cut away the pieces as shown in the photo above.
Chipboard is cut at 7 3/4"x2 7/8" cover with your cardstock on one side and place in the bottom.
Mats for front and back are cut at 7 1/2"x4"
Create the rolled top by pulling out slowly on the ends where you made the triangles and fold down.
Now cut a piece of the cardstock that is 3/4"x2 3/4" you will need two of these, round one end and place your magnets on this end. Put a strong adhesive on the other end and glue under the triangle on the ends, then put the other magnet on the side of the box and you are finished. If you want to decorate with something else it is beautiful, or keep it simple as I did and just stamp a sentiment.


These boxes hold lots of goodness. Have fun and be creative.
E
Wednesday, May 22, 2019
Purse Stationary Gift Box
Today we decided to start on some stationary box gift sets for craft fairs. After all they will be here before we know it. I love this one that looks like a little purse and it holds so many cards and envelopes you will be amazed. Below is the link to the video tutorial as well as photos and measurements. Hope you give this a try and if you do please remember to share on our Facebook Group.
You will need 4 pieces of cardstock cut at 10 1/2x7 1/2, on the long side score at 1, 5 3/4, 6 3/4 turn to the short side and score at 1/2 and 1 1/2 inches.
Cut away as shown in the photos below.


Glue one on top of the other with the tabs on opposite sides.
Mats for the front and top flap is 5 3/4"x3 1/2" you will need 6 to cover both boxes.
Small mat at the top is cut at 3/4"x5 3/4" you will need two for your boxes.
Handle is cut at 1 1/4"x8 1/2" for the bottom part and then the top part is cut at 1"x8 1/2 score at 1" on both ends.
Flap to cover the boxes is cut at 5 3/4"x6 score on the short side at 3 3/4 and 4 3/4"
Mat for this is cut at 5 3/4"x3 1/2"
Front and back mats are cut at 5 3/4x4 1/2 you will need 2
Side mats are cut at 3/4"x4 1/2" you will need 4
The piece you will need to join the boxes at the bottom is cut at 2"x6" and scored at 1" on the short side.
For how to assemble and all other instructions see the video tutorial.


Tuesday, May 21, 2019
Father's Day Shirt Card
A little quick and easy Father's Day card.
I made this one at 5x7 but you can make any size just adjust the measurements. Just a few cuts and glue and you have a fantastic card for any Father on your list.
Card base is 5x7 inches
Mat is 4 3/4"x6 3/4"
Mat is 4"x6 1/2"
Solid brown paper is 1"x6 1/5"
Collar is cut at 3 1/2"x3 1/2" and then just angled to look like a collar.
Pocket is cut at 2 1/2"x2 3/4" and then angled at the bottom with a small black mat behind.
Put your buttons on and do some faux stitching and you have it.
Remember to just glue your pocket on the two sides and bottom so you can include the gift card or money.


Thursday, May 16, 2019
Graduation Hat Card Box
Chipboard for the top is 11x11
Cardstock to cover the top is 12x12
Wrap this just as you would any box trimming the sides and gluing it together
Cardstock to finish off the hat on the bottom side is cut at 10 1/2x10 1/2 inch
Chipboard for the sides of the box and bottom is cut at 9 1/2x9 1/2 inches
Use your construction strips to put the box together, these are cut at 12x1 inch and scored in the center at 1/2 inch. Put your double sided adhesive on both sides of the score line. Place the folded side to the edge of the chipboard then the other side will glue the next piece of chipboard together. This is much easier if you watch the video.
I trip out the top of the hat box with chipboard that is cut at 9 1/2"x1 1/4" and then attached at the top edges to give strength and a place to place the magnets. You will need to place two pieces on and then measure the other two to go on the opposite sides. Again watching the video is much easier than trying to explain this.
I cut the opening of the hat at 3/4"x6 1/2" and then used my white marker to go around to make stitch marks.
The letters are from my stash, the chipboard glitter letter thickers
Hope you enjoy and give this a try. If you do please share on our Facebook Group.


Wednesday, May 15, 2019
4 Step Graduation Card
It is that time of year! Graduation! Can you believe it. And our first grandson is graduating. Oh my goodness where has time gone. We needed a special card for this occasion so we have designed a 4 step graduation card just for Aaron. Hope you enjoy this and give it a try. The full tutorial is below as well as all the measurements.
Measurements
Cardstock is 10x6 3/4 on the long side score at 3, 4 1/2, 6, and 7 1/2 inches
on the 4 1/2" score line fold and mark at 1/2" 1 3/4", 2", 3 1/4", 3 1/2", 4 3/4", 5" and 6 1/4"
Now using a Tsquare ruler, draw a line from this score line marked to the 6" score line. You will cut on these lines.
Mats are cut at 6 1/2x2 3/4 - 6 1/2x1 1/4 - 6 1/2x2 1/4
Top mats 6 1/4x2 1/2 - 6 1/4x1 - 6 1/4x2
The small squares in the middle mats are cut at 1 1/4x1 inch
Graduation hat is cut at 1 1/4x1 1/4 inch

Tuesday, May 14, 2019
Flower Pot With Forever Flowers
Lets create a flower pot and make some forever flowers. If you are like me, and I hope you are not, I kill every real flower anyone gives me. I have a complete black thumb. My girls give me flowers and I love them but after about a week they die on me. So I thought why not create a flower pot and some "forever flowers", these are the kind I can't kill. lol You can make these too, they are simple and easy and I will show you how in the tutorial below as well and give you the measurements. Now I cut these out with my cricut air, but you can always just use a circle and cut around the circle like we have shown in the past and make rolled flowers, works out the same.
I hope you give these a try and make sure to share on our Facebook page when you do.
Flower Pot
Cardstock 11"x11" score on both sides at 4" and 7"
Cut up on score lines on two opposite sides and then on the corner squares cut away all but 1" on each
Chipboard for bottom is 2 7/8"x2 7/8"
Chipboard for the sides is 2 7/8"x3 7/8" you will need 4
Cover with a matching cardstock and trim off the excess
After applying the chipboard to the bottom and the two sides with the tabs, glue the sides together creating your pot and then add the last two pieces of chipboard in.
Mats for the outside of the flower pot are cut at 2 3/4x3 3/4" you will need 4
Top cap mats are cut at 1"x3" score at 1/2" and dry fit. Trim off if necessary.
Glue a piece of floral foam in the bottom to place your flowers stems in.
The base chipboard is cut at 4x4 inches and the cover for the base is cut at 6x6, cover the chipboard, trimming the corners as making an album and then place a 3x3 inch piece on the top side to completely cover all chipboard. Glue this to the bottom of the vase. I used some flat back pearls for the feet.
Create your flowers and leaves and glue them onto floral wire, place them in your foam
You are finished, the only other thing I did was add some flat back pearls to the outside of the pot.
Decorate as you wish, makes a beautiful and lasting gift for anyone.


Thursday, May 9, 2019
Mini That You Can Add Pages In
This is a quick and easy mini that you can make as large or as small as you want. Just keep adding pages as you go. Below you will find the YouTube tutorial as well as photos and the measurements.
Hope you enjoy and make sure to share with us on our Facebook Page, we love to see your creations.


Hope you enjoy and make sure to share with us on our Facebook Page, we love to see your creations.
Start with 2 pieces of chipboard that are cut at 7 1/2x5 inches. Mark 1/2" from the end on the long side and cut this part away. I use tyvek to tape between my pieces so that they would not come apart. This is just a very strong envelope, that you get through the mail sometimes that has the fibers through it. Those that you can't tear...that is it.
To cover the chipboard I use cardstock that is 9 1/2x7 inches cut two of these.
The pages are cut at 7x5 inches and you will need to score at 1/2" on the long side.
Mats for the pages are cut at 6 1/4"x4 3/4"
Cut two pieces of cardstock that are 5x12" and 1 piece that is 5x6 1/2" score on all at every 1/2", accordion fold and glue the ends together.
Mats for the inside covers are cut at 6 3/4x4 1/2 inches, cut two more the same size for the inside covers.
I use seam binding to put mine together, but you can use twine, ribbon, or whatever you would like.
When putting your pages in you can glue them or just put them in with your ribbon or twine. You will put one on the second mountain and then skip 3 mountains, then another and skip 3 and another and so forth.
Hope you give it a try.
Enjoy E


Tuesday, May 7, 2019
Easy Wrap Around Gift Box - Using supplies From Our May E Club Kit
Here is a quick and easy project and it takes very few supplies. Just a few score lines, snip and clip and you are finished. Below are the measurements and the YouTube video. If you are an E Club Member your template and PDF is in the E Club Group. If you make this please be sure to share with us on our Facebook Page.


Measurements:
Cover is cut at 9 1/2"x5" and on the long side score at 1 1/2", 3 1/2", 5 1/2" and 7 1/2"
Mats are cut at 4 3/4"x1 3/4" you will need 6 or 7 depending on if you are covering the bottom.
Box cardstock is cut at 9x6" score on the long side at 2", 7" turn and score at 2", 4"
Mats are cut at 1 3/4"x1 3/4" for the ends. I didn't cover the front and the back but if you want to the mats are cut at 4 3/4"x1 3/4" cut 2
Chipboard to go inside of box is cut at 4 7/8"x1 7/8" for the bottom and the sides and the ends are cut at 1 7/8"x1 7/8"
That is it, quick and easy right?
Have fun and make beautiful things, E


Saturday, May 4, 2019
Mini Album and Gift Box in One
We had so much fun working on this mini album with the gift box attached. I am in love with this, have never seen one like it anywhere and I think I will be making many of these for friends and family. This was inspired in the middle of the night by a grandchild's toy book. You know those books that have the little mic and pad at the end of the inside that either sings or reads to the child, well that is what inspired me. I hope you enjoy this and give it a try. Please share your creations on our Facebook Page, we love to be inspired by you.
Here is the two video tutorials we did.
And here are the measurements:
For the album
Cardstock is cut at 12x8 1/2" plus you will need another page cut at 8"x8 1/2" glue these to together to make the long piece you will need to cover your chipboard. I show you how on the video.
Chipboard is cut at 8x6 1/2" you will need two
spine chipboard is cut at 1 1/2x6 1/2" you will need one
Glue these on the cardstock you glued together leaving a little over 1/8" between the spine and the front and back. Trim your corners and glue over the chipboard.
Inside cardstock is cut at 10 1/2x5 1/2" and 6 3/4"x5 1/2" glue these together as you did the outside pieces and glue on the inside cover of the album, making sure to cover all the edges of the CS you put on the outside.
Gift Box
Cardstock is cut at 9"x5 1/2" you will score at 1/2", 1 1/2", 7 1/2" and 8 1/2" turn and score at 1/2", 2", 3" and 4 1/2" Cut away as shown in the photo below and glue together.

Chipboard for the box is cut at 1 3/8"x5 7/8" cut 1
7/8"x5 7/8" cut 2
7/8"x1 1/4" cut 2
Covering cardstock is cut the same size
when you glue the front chipboad piece in only glue at the bottom leaving the top so the little lid hinge can slide in between the chipboard and the cardstock.
Outside mats for the gift box are cut at 3/4x5 3/4" cut 2
3/4x1 1/4" cut 2
top is cut at 1 1/4x 5 3/4" cut 1

Mats for the inside and outside of the album are cut as follows
6x7 1/4" cut 2 for front and back outside
Spine piece is cut at 4 3/4"x 6 " cut 2 one for inside and 1 for out side.


Inside mats are cut as follows
7 3/4"x 6 1/4" cut 2
the spine piece is the same as the outside

My pages are cut at 6"x12" and scored in the center
The cover of my inserts are cut at 6"x12" and scored in the center
You will sew these together as I show in the video
To attach see the video
Thanks so much and hope you enjoyed,
E
Thursday, May 2, 2019
Graduation Book Box Card
This is two in one, it is a great graduation card and gift box all in one beautifully designed project. The full tutorial is listed below as well as our measurements. Please make sure to share your creations on our Facebook page.
You will need two different colors of cardstock, I am using the school colors for my Grandson. The white piece is the box base and the blue is the book box cover.
The white cardstock is cut at 7"x9" and you will need to score at 1/2 and 1 1/2" on all 4 sides.
Cut away the 3 small boxes in each corner and then cut up on the score line for the square that is left and wedge a little on both sides.
Glue the box together leaving the small 1/2" strips alone until the end.
When you have glued all 4 sides then lets put some chipboard inside to make it a little more durable.
Sides chipboard cut at 7/8"x5 7/8" cut 2
End chipboard cut at 7/8"x3 7/8" cut 2
Bottom chipboard and cardstock piece cut at 3 7/8"x5 7/8" cut one of each
Glue the chipboard and the cardstock into the white box.
Now you will just fold over and attache the 1/2" strips at the corners, creating a look of a book.
Place magnets or Velcro at the two front corners of the white box strips and then put the others on the lid. This will keep you box closed.
For the top or outside of the book you will need a piece of cardstock cut at 9 1/2"x6 1/2" score at the following on the long side. 4 1/8, 4 1/4, 4 3/8, 4 1/2, 4 5/8, 4 3/4, 4 7/8, 5, 5 1/8, 5 1/4, 5 3/8, this is scoring at the every 1/8" mark. This will create the spine of the book box.
Decorate as you wish.
If you use the graduation hat it is cut at 1 1/2"x1 1/2"
Hope you have fun with this and make sure to share it with us.
Thanks, E


Wednesday, May 1, 2019
Reinforced Rectangle Box
This box is cut and durable. It is made from cardstock and covered with our designer paper from the May kit, but we have also added chipboard on the inside to give it extra strength. I am making these for Mothers Day gifts. Below you will find the full tutorial as well as the measurements for this project.


Start with a piece of cardstock that is 12x9 inches, score on all sides at 1/2" and 3 1/2". You will cut away the 3 small boxes on all four corners, fold and burnish.
Box top is a piece of cardstock cut at 7 1/8"x4 1/8" and score at 1/2" and 1" on all sides. Cut away the 3 boxes on the 4 corners and wedge the remaining tab.
Chipboard is cut at:
Bottom 1 7/8"x4 7/8"
Sides 2 pieces at 5x2 7/8"
Ends 2 pieces at 1 7/8x2 7/8"
Chipboard for the top, 1 7/8x4 7/8"
Mats:
Front and back, 2 3/4x4 3/4 you will need 2
sides, 1 7/8x2 3/4" cut 2


Subscribe to:
Posts (Atom)