
Wednesday, October 31, 2018
Friday, October 26, 2018
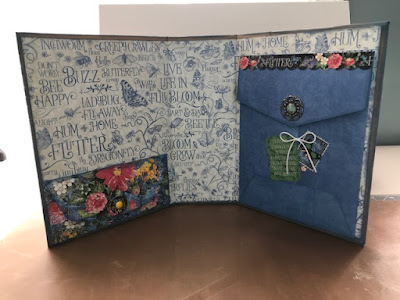
Thankful Thoughts Mini Album Page #3 with Cascading and Vellum
Mini album Page #3
YouTube Tutorial:
Click here for the Cricut cut file: http://bit.ly/2yXYFBf
(NOTE: if you don't have cricut access then some of these may not work for you. I do not charge for my files so if it ask you to pay
that is not me it is cricut.
PDF File: https://docs.google.com/document/d/1NgiWkq1-K_L2ntbaCY3j5ztLmbCG-zZtnDylPGpGhYo/edit?usp=sharing
Pages base is the same as above pages
The cascading part I explain on the video and the sizes are listed below.


Thursday, October 25, 2018
Mini Thankfulness Page 3 Lots of Flips and pockets
Pocket #2 and inserts for our mini
Click here for the Cricut cut file: http://bit.ly/2yXYFBf
(NOTE: if you don't have cricut access then some of these may not work for you. I do not charge for my files so if it ask you to pay
that is not me it is cricut.
PDF File: https://docs.google.com/document/d/1NgiWkq1-K_L2ntbaCY3j5ztLmbCG-zZtnDylPGpGhYo/edit?usp=sharing
The page is cut the same as the second page up to the flap, then we need to cut a belly band that is 2 ¾”x8”. I cut mine this wide to uses my border punch on each side if you don’t want to use the punch you can make it smaller. The mat for the belly band is 2”x7 ¼”
Top note is below as well as the tabs.


Wednesday, October 24, 2018
The Thankful Mini Pages and Inserts
YouTube Video:
Pockets and inserts for our mini album
Base pocket is 8 ½”x5 ½” score on long side at ½” on each end
Top of the base pocket is cut at 7 ½”x5 ½” fold flaps in and glue this piece on top
Flap for the pocket page is cut at 6”x7 ½” score on short side at ½” just on one end
Front decorative doors are cut at 3 ½”x7 ½” score at ½” on long side
Pocket insert is cut at 5”x7 ¼”
Front mat for the decorative piece is cut at 2 ¼”x7 ¼” you will need two for outside and two for inside.
Inside large mats are cut at 5 ¼”x7 ¼” you will need 4 of these to cover all areas
Insert mat is cut at 5”x7” you will need two to cover front and back of insert.
Insert mat is cut at 5”x7” you will need two to cover front and back of insert.


Tuesday, October 23, 2018
Mini Album 30 Days of Thankfulness
Today we created a November Thankfulness album, we started with the front and inside covers with a couple of pockets. We will add pages, pockets and inserts tomorrow and Thursday. Make sure to check in the description below for the PDF and the cricut cut file for the pockets we have used this far. We will be adding the other images on as we make them.
Click here for the instructions and the PDF file. http://bit.ly/2PgKz8f
Click here for the Cricut cut file: http://bit.ly/2yXYFBf
(NOTE: if you don't have cricut access then some of these may not work for you. I do not charge
for my files so if it ask you to pay that is not me it is cricut.)
Products Used:
Arteza Selfhealing mat, Rotary Cutter & Acrylic ruler: http://shrsl.com/18m7w
(USE CODE EDITHWRAY1 TO GET 10% OFF)
Chipboard: http://bit.ly/2Mfy4cm
KC Kraft cardstock: https://amzn.to/2D1wBlc
G45 Flutter Collection: http://bit.ly/2yzdYRz
1/2" circle punch: https://amzn.to/2q9cRDG
Cricut Maker: http://shrsl.com/175he
Cricut Access: http://shrsl.com/175hf
ATG Gun: https://amzn.to/2K9NM7c
ATG Tape: http://bit.ly/2Kd4diS
Tim Holtz Inks: https://amzn.to/2pQoOOk
Cricut Trimmer: http://shrsl.com/16ve1
Scor Tape: http://bit.ly/2H0Q5Yo
Tim Holtz Scissors: http://bit.ly/2J3lh77
Score Board: http://bit.ly/2NTdtXI
TH Glass mat: http://bit.ly/2vXmrvP
Pick Up Tool: http://bit.ly/2zMUWKx
Art Glitter Glue: http://bit.ly/2FGCXmz
TH Ruler: http://bit.ly/2DK7dxO
Neenah Cardstock: http://bit.ly/2Icxdqc
Blending
tool: http://bit.ly/2MvB8NT
Score Board: http://bit.ly/2GRRf9u


Friday, October 19, 2018
Thursday, October 18, 2018
Saturday, October 13, 2018
Friday, October 12, 2018
Tuesday, October 9, 2018
Friday, October 5, 2018


Thursday, October 4, 2018
Wednesday, October 3, 2018
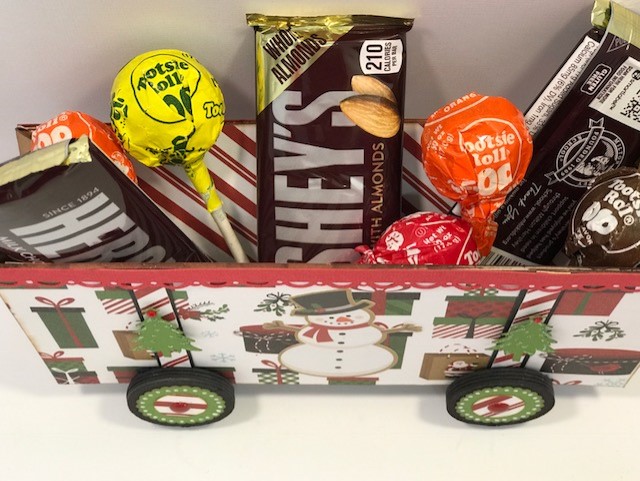
Antique Christmas Train Part 2 - The Carrier
Christmas Train Part 2 - The Carrier
Created by Edith Wray
Cricut Cut File: http://bit.ly/2QuO2gF
PDF File: http://bit.ly/2NisjXf
For all the products used please see below the video Here.

Wheels are cut at 1 ½”, scallop 1 ¼” and center ¾” 

Back and Front of the carrier cut at 8”x4”

Side Accordion Pieces
These two pieces are cut at 4”x4” and scored every half inch.
Bottom accordion cut at 4”x8” and scored the long way at every half inch.
Small strips for the sides are cut at ½”x4” and mat is ⅜”x4”
Inside mats are cut at 7 ½”x3 ½”
Tuesday, October 2, 2018
Christmas Train Series Part 1 - Engine
This is the first part of our Christmas train series, the engine. All the photos, PDF file and YouTube tutorial links are below. The Cricut cut file is linked under the video.
Hope this helps, I am not so good with PDF and cut files, sorry. I am trying to learn so I can share with you guys.
YouTube tutorial: https://youtu.be/O6Xf41aRnJw
Cricut Cut File: http://bit.ly/2NWjGqr
PDF File: Christmas Train: http://bit.ly/2zMW7I3
Products Used:
The overall size of the chipboard before cutting out pieces is 6x6
The large wheel is 2" circle with a red piece that is 1 1/5" and white piece that is 1 1/4"
The small wheels are 1 1/4" with a 5/8" piece in the center
Little red stripes on the front are cut at 1/4"x1 1/4"
Little circles are just cut from a cricut file, any punch or file that has a swirl will do.
All white dots on wheels and swirls on roof are made using a sharpie pen.
I used bakers twine on the little wheel to make the bow, and just a button under that.
Little red strip between the tires is 1/4"x1 1/4"
I use a sharpie to draw lines on the "cow catcher" on front.


Hope this helps, I am not so good with PDF and cut files, sorry. I am trying to learn so I can share with you guys.
YouTube tutorial: https://youtu.be/O6Xf41aRnJw
Cricut Cut File: http://bit.ly/2NWjGqr
PDF File: Christmas Train: http://bit.ly/2zMW7I3
Products Used:
Cricut Maker: http://shrsl.com/175he
Cricut Access: http://shrsl.com/175hf
Cricut Trimmer: http://shrsl.com/16ve1
Chipboard: http://bit.ly/2Mfy4cm
3D foam Tape: https://amzn.to/2nkuE9B
Tim Holtz Oxide Inks: http://bit.ly/2xR6lV8
Ink Blinding tools: https://amzn.to/2zMCuja
Scor Tape: http://bit.ly/2H0Q5Yo
Bone Folder: http://bit.ly/2DcBELW
Stainless Steel Pins: http://bit.ly/2QoR1a9
Snowfalke Paste: https://amzn.to/2QskrEx
Tim Holtz Scissors: http://bit.ly/2J3lh77
Score Board: http://bit.ly/2NTdtXI
TH Glass mat: http://bit.ly/2vXmrvP
Foam Tape: https://amzn.to/2IOrGTH
Pick Up Tool: http://bit.ly/2zMUWKx
Art Glitter Glue: http://bit.ly/2FGCXmz
TH Ruler: http://bit.ly/2DK7dxO
Hot Glue Sticks: https://amzn.to/2OsqXhf
Basic Grey Magnets: http://bit.ly/2K3Hr9MThe overall size of the chipboard before cutting out pieces is 6x6
The large wheel is 2" circle with a red piece that is 1 1/5" and white piece that is 1 1/4"
The small wheels are 1 1/4" with a 5/8" piece in the center
Little red stripes on the front are cut at 1/4"x1 1/4"
Little circles are just cut from a cricut file, any punch or file that has a swirl will do.
All white dots on wheels and swirls on roof are made using a sharpie pen.
I used bakers twine on the little wheel to make the bow, and just a button under that.
Little red strip between the tires is 1/4"x1 1/4"
I use a sharpie to draw lines on the "cow catcher" on front.


 | ||
|
Subscribe to:
Posts (Atom)