
Thursday, June 1, 2017


Wednesday, May 31, 2017
This is for Aaron our Grandson
I am so pleased to be sharing this post with all of my Facebook friends and family. Our company has now partnered with NationalAutismResources.com, a fantastic group of people.
As most of you know we have a grandson, Aaron, who was diagnosed with Autism almost 14 years ago. This is something that has impacted our lives for almost 17 years now, and we are just the grandparents. Our daughter and son-in-law face these challenges and struggles with our sweet grandson every day. Aaron has come a long way from a little boy who the doctors said would never talk, communicate, or show love and affection, to the handsome loving young man he is today. He not only talks but also sings gospel songs, and in front of large crowds. He has come a long way but there are still obstacles and challenges each and every day for Aaron and his family.
Autism now effects 1 in every 68 children born in the United States. It is one of those silent illnesses that you never know about until one day you look at your 4 year old and wonder why he is not talking, communicating or socializing as others his age do. When my grandson was born in 2000 Autism effected 1 in every 500 children. The increase is staggering and continues to rise. We have to find a cure for this terrible illness.
My grandson looks just like any other 17 year old, therefore it is hard for someone who doesn't know he has issues to understand why he is sometimes having a meltdown because his schedule was changed. Autistic children lead a very structured life and anything out of the norm can cause them to come apart. There is just not enough awareness for outsiders to understand. So the next time you see a child "misbehaving" in public and you think to yourself, "that child needs discipline" try to remember that 1 in every 68 children you meet may be Autistic and can not help their actions anymore than you can help scratching an itch.
I said all of that to say this. In teaming up with the National Autism Resources Co, we are an affiliate for them. This means that you will see post from time to time from me that has photos and or links to the products NAR carries and information I receive from the. If you click on these links and make a purchase I earn a small commission. All the money from this affiliate link/s will go to Aaron's savings account to help with his education, physical and mental needs. If you would like to help Aaron out you can do so by clicking one of these links and if you see something that you or someone you know could use you can make a purchase. The cost of the items is the same, there is no price increase for using these links.
Thank you in advance for your support.
Below is a photo of our sweet grandson.


As most of you know we have a grandson, Aaron, who was diagnosed with Autism almost 14 years ago. This is something that has impacted our lives for almost 17 years now, and we are just the grandparents. Our daughter and son-in-law face these challenges and struggles with our sweet grandson every day. Aaron has come a long way from a little boy who the doctors said would never talk, communicate, or show love and affection, to the handsome loving young man he is today. He not only talks but also sings gospel songs, and in front of large crowds. He has come a long way but there are still obstacles and challenges each and every day for Aaron and his family.
Autism now effects 1 in every 68 children born in the United States. It is one of those silent illnesses that you never know about until one day you look at your 4 year old and wonder why he is not talking, communicating or socializing as others his age do. When my grandson was born in 2000 Autism effected 1 in every 500 children. The increase is staggering and continues to rise. We have to find a cure for this terrible illness.
My grandson looks just like any other 17 year old, therefore it is hard for someone who doesn't know he has issues to understand why he is sometimes having a meltdown because his schedule was changed. Autistic children lead a very structured life and anything out of the norm can cause them to come apart. There is just not enough awareness for outsiders to understand. So the next time you see a child "misbehaving" in public and you think to yourself, "that child needs discipline" try to remember that 1 in every 68 children you meet may be Autistic and can not help their actions anymore than you can help scratching an itch.
I said all of that to say this. In teaming up with the National Autism Resources Co, we are an affiliate for them. This means that you will see post from time to time from me that has photos and or links to the products NAR carries and information I receive from the. If you click on these links and make a purchase I earn a small commission. All the money from this affiliate link/s will go to Aaron's savings account to help with his education, physical and mental needs. If you would like to help Aaron out you can do so by clicking one of these links and if you see something that you or someone you know could use you can make a purchase. The cost of the items is the same, there is no price increase for using these links.
Thank you in advance for your support.
Below is a photo of our sweet grandson.

Sunday, May 28, 2017
Exciting news! It's Free!

Would you like to save money? Well we can help with that. Starting June 1st we will be offering FREE shipping for all orders over $100 at Scrapbookingwithme.com. We want our customers to have the best experience when shopping with us. This is just our way of saying thank you from our team.
Note: You will need to use the code Freeship at checkout and this offer is only available for the USA. Shipping method will be at the shippers discretion. This does not apply to orders on our Facebook store and can not be used in conjunction with any other coupon.
Thanks E
Friday, May 26, 2017
Stand Up Graduation Card Easel
Create this beautiful and quick stand up graduation hat easel in just a few minutes.
If you are like me this time of year if hectic and you need to save all the time you can. And this project does it for you.
Here are the measurements and the tutorial is on my YouTube channel.
Cardstock 10x5 inches
Score at 2 1/2 and 5 inches on the long side
Then you will score diagonally from the 2 1/2" score line down to 5 on both sides.
Then go to the largest box and mark the center at 2 1/2", draw a line from that mark to where the diagonal line stopped at 5". This part you will cut away this makes the point of your hat.
Mats for the hat at 3 1/4"x3 1/4"
Bottom mats are: 4 3/4x2 1/4", then mat for stamping is cut at 4 1/2 x 2 inches
Hope you enjoy!

Wednesday, May 24, 2017
Introducing! The New Garden Life!
Here is another beautiful collection from Blue Fern called Garden Life. This collection promises to make you fell the spring weather and all the beauties that come with. Purchases this collection now either through our ONLINE store, or on our FACEBOOK store. We know you will be happy you did.
Here is a small sneak peek of this beautiful collection.
Don't forget to sign up for our NEWSLETTER so you will be notified of all new collections coming in.
Also subscribe to our YOUTUBE, we show new collections as they come in.


Here is a small sneak peek of this beautiful collection.
Don't forget to sign up for our NEWSLETTER so you will be notified of all new collections coming in.
Also subscribe to our YOUTUBE, we show new collections as they come in.


Thursday, May 18, 2017
Graduation Slider Gift Box with Hidden Card
This is a cute and simple project but it is oh so fun to giveaway. Put candy in the box and make them think that is all they are getting, and when they slide the box out to see, presto you have a card slide out the other end.
So easy and fun for graduation gifts.
The tutorial is uploading now and here are the written measurements and links to supplies I used.


So easy and fun for graduation gifts.
The tutorial is uploading now and here are the written measurements and links to supplies I used.
Cardstock 8x8 inches
Use your envelope punch board and punch and score at these measurements
2 5/8" punch & score, turn
3 3/8" punch & score, turn
2 5/8" punch & score, turn
3 3/8" punch & score, turn
Then go back to the score lines that are beside the punch outs and place the little point of the envelope punch board on that score line, punching again and scoring. This score line should come out right in the middle of the side punch you made prior. Do this all the way around.
Now you need to cut some tabs, take the two larger points and cut the score line to the side of the large points just up to the first score line, this creates 4 tabs to glue the box together.
Now we need to do a little more folding. Take one of the tabs and fold it over at the first score line, then fold it over again, causing the end of the tab to score along with the second score line. These parts will glue down to the inside of the box creating stronger sides.
Bottom of the box cut at 4 1/8"x3 1/8" - this piece will go in the bottom of the box when you have glued all the sides down to the inside. Just as another extra support.
Slider card holder- cut at 4 1/4"x7 1/8" score on the long side at 3/4, 7/8, 4 1/8 and 4 1/4. Fold and burnish well.
Slots for the plastic slider. On the bottom of the piece you just created come in 1/4" from the last score line and make a small mark, do this on both sides and on both ends. Then take you ruler and join these 1/8" from edge of paper. You are cutting out a 1/8" slot.
Plastic slider: I used a sandwich bag, it is better to use a larger plastic bag that does not have any side edges on it. The smother the better. Cut this piece 2 3/4"x8 3/4" fold around keeping it in the slots and glue the ends together. Be careful not to get glue on the box, just glue the plastic together so it will slide around. I used score tape.
The Hidden card piece: cut at 4 1/8"x3 1/8" - put glue just on one of the short end of this piece, not all over. If you have a side that you want up when you slide it out make sure to put the adhesive on that side. You will then place it on the plastic inside the flaps and center and glue. Then glue the flaps together trapping the card inside.
Take the box you made and put adhesive just on one end, on the other end put a piece of ribbon in the center for a pull tab, gluing it to the bottom of the box. Make sure to just glue the box to the plastic only. Glue the box on the opposite end as you did the slider card. You want them to slide out on opposite ends. Press it down in the center.
Wrap Around: Cardstock 4 1/4"x10 1/2" score on the long side at 2, 3 5/8, 6 7/8, 8 1/2. Wrap this piece around the box and slider piece and glue to the bottom of slider piece only.
Now you are ready to decorate:
Mats are cut at 3x4 inches and 3 3/4x2 3/4 inches.
Cap is cut at 2x2
Link to the video tutorial: https://youtu.be/ejR7Xejh3Zo
Products I used:
Cardstock: https://goo.gl/8REbhM
Scor Tape: https://goo.gl/I92aIw
Bone Folder: https://goo.gl/9HWSNW
Die Release Tool: https://goo.gl/TXVLHx
Art Glitter Glue: https://goo.gl/gr7SDA
Our Store: www.scrapbookingwithme.com


Cruise, Craft and Create!
We will be creating this beautiful Faux Leather Travel Folio on our cruise retreat in September! This is made from a Faux leather material from Cricut and very durable. Holds lots of documents, credit cards, money and more. Plus we are making a removable notebook to take notes, to do list etc.
The classes are only $19.99 and all supplies are furnished. A link to sign up will be posted very soon. Limited space is available so make sure to follow this blog to get notified when the classes go up.
If you have not signed up for the cruise, make sure to do so soon to get in on the best rates. Contact Libby at cruisewithmaymay@gmail.com
Hope to see you there! We are going to have a blast!


The classes are only $19.99 and all supplies are furnished. A link to sign up will be posted very soon. Limited space is available so make sure to follow this blog to get notified when the classes go up.
If you have not signed up for the cruise, make sure to do so soon to get in on the best rates. Contact Libby at cruisewithmaymay@gmail.com
Hope to see you there! We are going to have a blast!


Tuesday, May 16, 2017
Travel Folio and Huge Announcement
Today we made a travel folio to keep those receipts, documents, or just memorabilia in when you are traveling. I love making these little folios, so easy and simple, but look so nice. And of course we went with a beach theme since I love the beach and wish I was there now lol. All the links to the products I used are below and the link to the full tutorial as well.
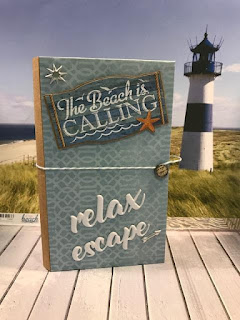

2 pieces of Chipboard cut at 4'x7'
Book Spine heavy card-stock cut at 3"x7"
Score the spine piece at 3/4" on each end of the long side, then score at every 1/8" between those two score lines, creating the spine fold.
2 pieces of card-stock for the cover cut at 9'x5' inches
Place on outside starting at where the chipboard meets the spine, leaving about the same amount of overhang on all three sides.
Flip over cut out your corners and fold excess over creating your book cover.
Inside cover piece, cut at 3 7/8'x 6 7/8' inches. You will need 2 of these.
Glue these on the inside covering the raw edges of the outer paper.
2 pcs of card-stock cut at 4x4.5, score at every 1/2" on the 4.5" side.
Accordion fold this
5 sheets of paper for the folio pockets cut at 6 3/4x3/78"
These will glue on the mountain folds of the accordion pcs, use a strong glue.
Pockets: 2 cut at 4 1/5x5 score at 1/2" on two long sides and one short side. Put scor tape on these folds cutting out the corners and glue on the right side.
Decorate as desired
Cardstock: https://goo.gl/8REbhM
Chipboard: https://goo.gl/EtteVq
Scor Tape: https://goo.gl/I92aIw
Beach Paper: https://goo.gl/X5w05d
Bone Folder: https://goo.gl/9HWSNW
Die Release Tool: https://goo.gl/TXVLHx
Art Glitter Glue: https://goo.gl/gr7SDA
Online Store: www.scrapbookingwithme.com
YouTube Tutorial: https://youtu.be/SMIzUrOsjK8


Friday, May 12, 2017
Melina's Birthday Swiper Card
This is a quick and easy card but very, very cute. Below are the measurements and you will find the full tutorial on the YouTube link below.
You will need:
2 pieces of card stock 4 1/4x6 3/4 inches
On the long side score at 1", and 1 3/4" on both pieces
Mats solid white cut at 4 1/8x4 7/8 inches
Designer Paper mat cut at 4x 4 3/4"
Side panel mat: solid white cut at 4 1/8"x7/8"
Designer paper mat cut at 3/4x4 inches
The Swiper part is cut at 2x2 3/4 inches
Score on one of the points just 3/4" in from point making sure you keep it straight across.
You will fold the score lines on the two card stock pieces like a "Z"
On the card stock piece you are using for the front, measure down on the first score line from to
1 3/4" and make a pencil mark.
At this point is where you will glue the part on your swiper that you just scored and folded. Gluing the long part straight up the score line.
For the tiny envelope I cut this at 3x3 and scored in from each point 1 1/8". You can always put balloons or other things on here doesn't have to be an envelope. Just glue the envelope on the swiper about half way down.
Hope this make sense, this one is not so easy to write up. Maybe by watching the tutorial you can get the jest of it all. Have fun and any questions let me know.
YouTube Video Link: https://youtu.be/oqwCeXYcGgM
Our Store: www.scrapbookingwithme.com
YouTube Video Link: https://youtu.be/oqwCeXYcGgM
Our Store: www.scrapbookingwithme.com
Links to products we used:
American Craft cardstock packs: https://goo.gl/sRJMEb
Tim Holtz Oxide Inks: https://goo.gl/zb5Kis
Martha Stewart Score Board: http://amzn.to/2rbrvJT
Art Glitter Glue: https://goo.gl/ZS3PUv
Scor Tape: https://goo.gl/BCCSia
Big Shot: https://goo.gl/BCCSia
Scollop dies: https://goo.gl/BCCSia


Subscribe to:
Posts (Atom)